Your Wine Cellar Needs Another Wine Rack!
May 20, 2011

KTW #0611
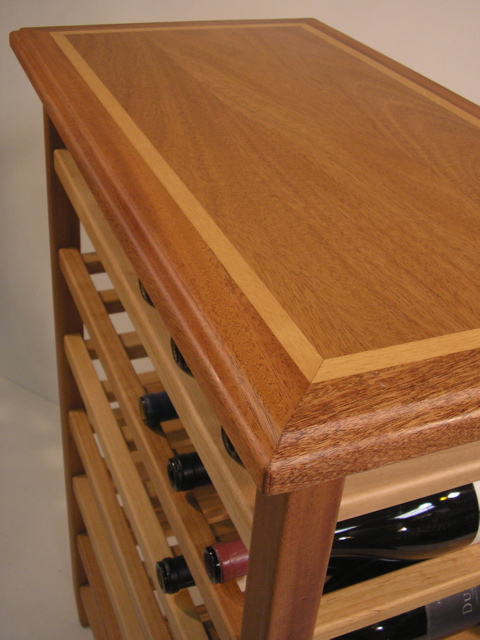
Here is another floor standing wine rack made from the Khaya (known also as African Mahogany). It’s a 6 X 6, six bottles wide and six racks tall, for three cases worth. The dimensions are 28″ x 15 1/2″ x 42″ tall.
Below: I have glued up contrasting edge band material and crosscut a board, then folded the board back on itself at the cut and glued it up for the field of the top.

There is a woodworking blog that I follow…
http://larrysworkshop.wordpress.com/
Lazy Larry has some very cool ideas about laminating different woods and creating interesting 3D patterns. I decided to start simply and use some of his basic ideas to create my table tops. Above: you see I have ripped some thin strips of White Oak from my dwindling stash that was dried from a fallen tree over on SW Crestwood Lane. I sandwiched a wider strip of Black Walnut, then glued them up with a wide strip of Khaya to form the edge band.

I’m not a very good photographer. I’m of the… take tons of pics… and hope some turn out OK, school of photography. Most of the time. I’m paying attention to what I’m trying to do in the shop, and forget to take shots as I go along in the process of building. Too many times I have stopped to take a photo, been side tracked, only to make mistakes because I forget what I’m doing. I hate that.
Next I milled up the board in the middle here for the legs, rack parts, carcase and drawers…

If I actually took photos of all the individual steps I go through, there would be hundreds of pictures. Unless you are into woodworking, it would be overkill, but I’m just trying to illustrate how many steps there are to making these things… how many steps there are for potential mistakes!

With every new project, I try to refine my ideas and processes, to be faster and still have a shot at quality.

Many woodworkers hate the finishing process. Some do great joinery only to apply bad finishes. I actually like applying finishes and with each piece, I add to my knowledge and experience. Still, it’s like shooting dice and no matter how hard you try there are potential problems. The experts know how to avoid problems and how to fix mistakes and any pitfalls that might occur. Most finishing materials are perishable products and you get one shot at it. Quality finishes are like shooting at a moving target… it’s difficult but not impossible.
Applying a finish is the payoff for me. After I have milled all the parts cleanly and glued everything up square and true, then sanded like crazy… seeing the grain pop out is like opening a present.

Lazy Larry’s lamination idea turned out really cool. I like it. I love the little ripples or “quilting” in the Black Walnut feature strip. There could be so many variations on this concept, I can hardly wait to try some more complex ideas.

More to follow…
Wine Racks-Custom Designs-Made In USA
April 29, 2011

KTW #0411
Six bottles wide by seven racks high, gives you a 42 bottle capacity. Notice how even the fat Champagne style bottles that many wineries are using for their Pinots fit without touching.

This legs and top of this rack was constructed out of Khaya also known as African Mahogany. The racks and contrasting feature strip laminated into the top are Oregon Alder hardwood.

It is 40″ tall, 28 1/2″ wide and 15 1/2″ deep.

I apply three coats of poly-urethane that is virtually water proof and very stain resistant. I use a satin sheen that brings out the natural color and grain of the lumber, imparts a velvety smooth feel, and gives that hand-rubbed antique effect.

I’m surprised that through the whole stack of boards my neighbor Lavrens passed on to me, each piece has very different shades in the color, but yet has the same grain characteristics.

If you are a serious wine enthusiasts, you probably buy bottles a little too expensive or too many bottles that were a deal that couldn’t be passed up. You could treat yourself to a nice hand made rack like this to stash your treasures!

Custom Wine Racks in Portland Oregon
April 26, 2011


KTW #0411-#0511
6 x 7 = 42 and 4 x 6 = 24 bottle capacity racks. #4 on the left is Khaya African Mahogany and #5 is Machiche, a very dense hard tropical lumber from Central America (sometime called Black cabbage-bark). The racks and feature strips in the mitered edge band on the tops is Alder from Oregon.
I got a message right after my last posting and so KTW #0311 has found a good home. Thanks for the support Pete… and for sending me photos!

KTW #0311
I have some interesting wine rack projects going on and I’m starting to think about slicing up a few logs that have been drying for more than a year in the back corner of the shop . More to come, stay tuned…
Free and Knot Free Wine Racks…
March 26, 2011

KTW #0311
Lavrens, my neighbor at the shop, came through for me again. He has a buddy who works or worked for a Canadian lumber wholesaler. A few years ago when the economy was still functioning, they bought units of exotic lumber to sell to high-end users. As the economy was destroyed, they went back to selling construction grade lumber and plywood. That didn’t work either so they closed the warehouse.

When they cleaned out the building, this unit of lumber was not in the inventory, so Lavren’s friend gave it to him, and he gave some to me. It is an African Mahogany called Khaya Ivorensis or commonly Khaya.

I cut one of the pallet skids in quarters for some legs. I was impressed by beauty of the grain and the color. It is fairly hard and dense. I don’t like the way the sawdust smells. It is a little acrid, but not horrible like Ipe, and certainly not as nice as real Honduras Mahogany.

These must have been some big trees because it appears like all heart wood. It mills up straight and true with no warping or cupping. Nice to work with and easy to machine.

Since I had quite a lot of material to choose from, I decided to make a piece that is narrow and a little taller. It holds 24 bottles and has a drawer for cork screws, stoppers and wine glass charms. 23 1/2″ wide x 16 3/4″ deep X 40″ tall.

The top turned out great. I planed a piece, crosscut it, then joined it back on itself for the field. You can barely see the joint.

I used Oregon Black Walnut for the feature strip and drawer pull.

The edge band was from a different piece of lumber. It’s pretty amazing how different the colors turned out from piece to piece. After I sanded everything off, the colors seem rather uniform. The urethane I use made the grain and true colors pop out.

While the grain and figure from piece to piece is very uniform, look how different the legs are compared to the carcase, and the edge band against the field on the top.

Like I said, free from any knots… and my favorite type of wood too… free. Thanks Lavrens!
Knot another wine rack!
February 16, 2011

Yeah, another one. My neighbors who make custom upholstered furniture gave me a bunch of Alder scraps a few months ago. Every month or so, they get a unit of FSC Alder lumber and proceed to make piles of narrow rips and other scraps, perfect for me to mill into rack parts.
I generally try to make parts production style so I can efficiently produce two to four or five racks at a time. This one was cut out along with the rack on my last posting. My deal is to try making all my stuff out of solid wood and not glued up… if I can. It irritates me to look at production furniture and cabinets that boast solid wood, only to see glue joints everywhere.
As I have said before, it would be easy to draw ideas up, go to the lumber yard, buy a bunch of nice material and make cool stuff. The problem is that it costs money. If I could find ways to sell these things and recover that cost, I would be cranking out wild stuff from the many pages I’ve sketched in my design note books.

Sometimes I can find big enough pieces to make solid legs, but in this case, the scraps were wide and long enough, but not thick enough. To solve that, I laminate a different kind of wood so it becomes a part of the design, not just a way to use thinner (cheaper) material, like the typical manufacturing process. In the end, it’s no doubt cheaper, easier, to buy thicker 8/4 material for the legs, but like I said, it cost money. I have way more time than money. I began laminating parts so that they becomes part of the design and look on purpose. In this case, Oregon Black Walnut milled from some logs I dried.

The field for the tops are usually two pieces glued up, either book matched or a single board folded back on itself at the cut, so that the grain matches and many times make the joint invisible. I started using a contrasting feature strip when I laminate the tops for the same reason… make big parts out of small pieces and have the laminations be part of the design.
Knot How It’s Supposed To Work…
November 22, 2010

It can start with a need. In this case, a friend has been remodeling his house and needed to put a key in a door at the end of a hall. All he told me was that he wanted a table to put a lamp on, so he could see the door knob, and that the space in the corner of the hall was 10″ by not more than 18″.
I like to have some kind of symmetry in my designs and the one dimension that seemed fixed was the 10″. Quickly I thought, how about 10″ deep by 15″ wide and 30″ tall… multiples of five.
I looked through my piles of wood and lumber for some walnut but didn’t really find anything that jumped out at me. I uncovered some gnarly pieces of Red Oak that my friend had given me last year and I’d completely forgotten about. I planed off the sides to see some nicely figured pieces.

They were just 29″ long, perfect legs for a 30″ table height. I squared them up on the jointer and thickness planed them. There were a few defects, checks, splits and splintery grain. I also thought because the piece was pretty small, I needed to cut them down so they would make sense within the scale of the piece. Hopefully I could cut out the defects too.
I fooled around with a bent piece of quarter round moulding that I use with a string to adjust the bow for marking curves. My idea was to make curved legs and cut out the defects. I cut a piece of plywood the size of the leg blanks for a template.

The hardest thing to do was figure out the sequence of cuts so I’d have a flat surface to run the against the fence and get a square part with which to join the carcase. Here is the first cut…

…then flip it 90 degrees for the second cut, and still have a flat surface to run against the table.

Legs.

That was the end of the day. I had a few random pieces of Red Oak in my stash but not enough to do much. I left the shop that night about eleven thirty in a driving rain. I got to the end of block where there is a new and used resteraunt supply business. They always have stacks of pallets and cardboard set out for the recyclers. There was an Oak counter with white melamine top and shelves sitting in the rain. I got out, kicked the particle board sides and top off it, and stuck these nice raised panels in the truck,

Nice stash of free material, except that when I cut them apart, the panels had been run through a sander or planer and were only 9/16″ thick. Couldn’t use them for a top like I hoped. Oh well, the styles and rails were still 13/16″, so I cut them up. I couldn’t use the panels, so I rummaged around and came up with this…
 … a piece of Goncalo Alves that one of my shop neighbors gave me. It was an
off cut from a big board he used to make cabinet doors.Next I laminated pieces of
the Red Oak from the styles and rails on the salvaged counter and laminated
Black Walnut for the feature strips in my new top.
Next, I miter the edge band and…


… and glue the top together. Next I made the carcase sides, cut out the drawer front.

I make the pieces a little wider than I want, so I can rip the drawer front out and glue the frame back together. The you see the grain pattern run through the piece. At least that’s the idea. Next I machine the tenons for joining to the legs.

Next I machine the mortices in the legs on my router table equipped with an IPM fence. Same deal, it was harder to figure out the sequence of cuts, so I had a flat surface to run against the table and fence, than it was to machine the parts.

The IPM machine allows me to make extremely tight fitting joints. I have to make them at least sloppy enough, so that when they get wet with glue, they slide together and won’t wipe the glue off the joint or have to force it together. Every click of the detent wheel moves the fence a thousandth of an inch.

I sand all my parts then glue up. Unfortunately, in my haste to get everything square and true, I flipped the front backwards and by the time I realized it, I couldn’t pull it apart again, the glue dries that fast.

I know and you know, but nobody else will every know. I make runners that fully house the drawer, so I can have tight fitting drawers that slide smoothly and positively. I should have dovetailed the drawer sides, but once I have made a mistake that I can’t or don’t want to spend the time recovering from, I just want to finish and see if the overall design works for me. Still, I make traditional box joints to hide the dado for the drawer bottom.

The drawer bottom was a scrap of Jatoba. I looked through a big box of my signature drawer pulls. It took me years to come up with pulls that felt good in your fingers when you open the drawers. I make them by the dozens because it takes six router setups to create them. I don’t want to stop and make one in the
middle of a piece.
Unfortunately, I used all The Red Oak pulls on a previous table,
but at the bottom of the box was one I made from Spalted Apple. Here I route a
mortice in the drawer front to accept a tenon on the back of the pull. A perfect
color match!

Finally I put it all together, did some finish sanding and applied three coats of a
water based lacquer.

When I showed it to my friend, he told me his father had worked at a millwork company in Tigard, Oregon for thirty years and that the pieces he had given me, were rejected turning blanks he brought home to burn forty years ago. My only cash outlay was for the Lacquer.

I was disappointed that I didn’t get the grain to run through the front of the carcase, but I like the way the legs came out. I’ll put them in my repertoire and do better next time… maybe in Black Walnut.

My friend really like the piece and thought it was better that he envisioned.
Wine Enthusiasts Christmas Gifts…
October 26, 2010
What to get the wine connoisseur or alcoholic wino for Christmas? How about a counter top wine rack?

KTW #1810a
Gen-u-wine Knot Traditional Woodworks wine racks. Produced from local FAS Kiln Dried Alder lumber. (The Forest Stewardship Council is creating sustainable forests worldwide, producing and certifying sustainable lumber for a growing industry of green builders.) The through tenons in the bread board style tops are made from Oregon Black Walnut logs I have dried and milled.

15" x 15" x 14" tall
Further more, I machine parts and hand assemble these wine racks from rips and off cuts, gleaned from the custom upholstered furniture business next door. If I didn’t take it, they would burn it or put in in the dumpster.

I apply three coats of bar top poly-urethane that is stain resistant and virtually water proof. I use a flat sheen so that you can see the natural color of the wood and the grain, not a glossy wet looking finish.

Because my design is modular, I can make four bottle, six bottle and eight bottle racks, that will fit on a counter top or sideboard. I can build them with my miterd tops too… like this four bottle by two shelf model.

KTW #1710
Again, Alder hardwood with Oregon Black Walnut for the feature strip in the top.

23" x 15 1/2" x 14" tall
So many combinations and ways to construct these wine racks. I have some really interesting harwood logs that are drying but not ready to make parts out of yet. I would like to make these from Black Walnut or White Oak eventually too.


If you have some floor space, maybe a unique 36″ tall (counter top height), 20 bottle rack to display your collected wine treasures.

KTW #1610a
The checker board top for this piece was made from some kind of fruit wood, probably apple, for the light squares and Black Walnut.

These legs were milled from a very heavy, hard, dense, tropical wood that a friend of a friend got for me. He works for a lumber importer that was doing inventory and found these big planks buried under dust and debris for years. When they couldn’t identify the planks, didn’t know where they came from, I fortunately ended up with them.

The bread board ends are Sapele, the through tenons are Australian Lacewood and the shelf racks are Alder.

I cut out three of these racks, but only had enough material for two tops, so someday I will come across some nice lumber and make a different top on legs and shelves like these.

KTW #1610b
The top for this piece I made from Alder for the light squares and highly figured Balck Walnut for the dark squares.

23" x 15 1/2" x 36" tall
As much as I try make these in a production fashion, it’s still mostly one offs or two offs like these examples.

I tried to cut boards so that the dark figured grain pattern looks like it runs through lighter squares. My photographs don’t really do it justice.

About the time I get pieces ready to apply a sprayed on finish, I’m already thinking about ways to put the next ones together. There is still time to make some special presents. What is next?
