Touring Oregon Wine Country?
August 6, 2011
After visiting all the great wineries and fantastic locations… YOU NEED ONE OF THESE… to hold the liquid gold!!

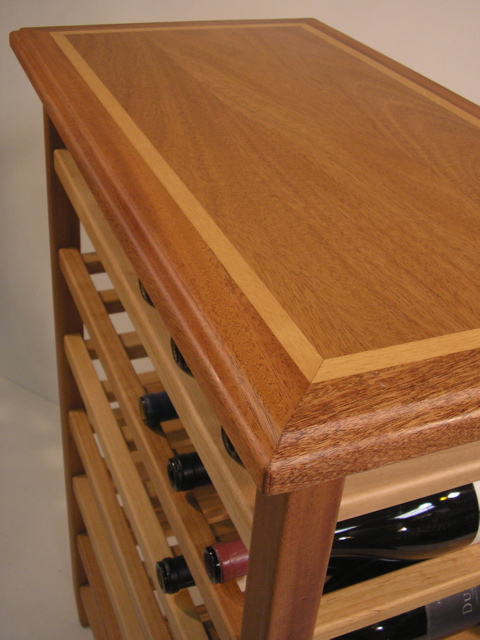
KTW#0911 -- 4 x 5 with a drawer -- African Mahogany and Alder
The summer has finally hit and we are in the 80s. The last couple years we had winter from Thanksgiving until July. Oregonians have coined a term; Junuary, for how dismal the weather was in June. I bet the grapes are loving it now.

Our winters are not that bad really, they just seem to last forever. It gets old, but the summers and fall here are worth it. We get a little bit of snow in the Willamette Valley if we are lucky, but not like the East… that is just crazy. Hey, if we want to see snow, all we have to do look east and Mt. Hood is glistening in the sun. They had great snow pack and were skiing and snow boarding through June. Drive 45 minutes and your in it.

Oh yeah, check out the triple lamination in the top. It’s an idea I stole from my cyber-friend in Austraila, Lazy Larry. The top came out pretty nice. This Mahogany has such a rich color and grain that my poor photography is not doing it justice. The water proof Poly finish I use really make it pop.

To the west is the Oregon Caost. One could be surfing out at Pacific City in the morning and in a few hours be up at Timberline on Mt. Hood looking at the Glacier! If you work it right, you could grab a bottle of wine from a tasting room along the way and cap the day off with a good meal.

My signature drawer pull. I was given four big slabs of this curly Maple from the Seattle area. It is dry as a bone and incredibly beautiful. I’m going to make an electric guitar or bass out of one of the slabs.

A long time ago, Oregonians decided that they wanted to leave the coast free of development, so the beaches and land is mostly like it always was… stunning. As is the rest of Oregon… the Cascade Mountain range through the Central part of the state and the arid high Desert in the east. Big place with not many people.

Portland is a gem of a town. It has taken a ribbing from the Portlandia spoof on YouTube… Portland, the place where twenty-somethings go to retire. A Bay Area musician friend told me… “Portland is like a minature San Francisco only artsier.” Great music and arts scene, and as a people we are into food, beer and wine in a big way.

If you are lucky enough to be touring our Oregon wine country, I think you will find that you have only scratched the surface. You could spend months here… not see it all… and then it starts all over next year and is different.
Check back, I have more to show you soon.
Wine Racks Hand Made In Portland Oregon, USA
August 1, 2011

KTW #0711, #0811
Are you serious about your stash of wine? GOT RACKS??

KTW #0711, #0811
A pair of six bottle wide racks that I cut out at the same time. Don’t they look naked without any wine bottles? That is where you aficionados come in…

KTW#0711 six bottles wide, five racks tall
… fill these racks with wine! Wouldn’t they look better with an eclectic mix of glass colors and labels? Ha,ha, ha!

KTW#0711 (6 x 5)
It would be too easy for me to draw a bunch of different rack designs, then go to my lumber supplier, buy a bunch of material and make them up. The first problem with that is that the material would cost me money. This is not a tool that I have.

KTW#0811 (6 x 6)
If you have followed this blog at all you know that I’m a scrappy, dumpster diving, recycling, reclaiming, up-cycling, woodworking kind of guy. Most of this material was salvaged from my neighbors who build custom uhpolstered furniture. They can’t really use small rips and off cuts from their manufacturing process, so they had been burning them or just putting it into the dumpster.
They buy ASC certified cabinet grade Alder. I really like the different shades of golden brown and tan that the water proof polyurethane finish I use imparts. For the features strip laminations, I use scraps of Oregon Black Walnut from logs I have dried and used for bigger pieces. I can’t bare to toss anything out, and I spend way too much of my time looking through stacks of scraps, to try and visualize what I might be able to make out of them.
I would have made an identicle pair but there weren’t any pieces long enough, so they are as tall as the pieces I could glean for the legs. It is so much harder to design and build pieces from found material.
I try to use the contrasting Black Walnut laminations to be part of the graphic image and design. The real reason is that I don’t get any really thick pieces and the woodworker in me thinks it is better to draw attention to the joinery than try to hide it.
If I had lots of big boards, so that I could make parts with all the color and grain patterns being similar, I could successfully deguise the joints. Still, I sort through stacks of my scraps to find complimentary color and grain patterns. But it’s organic you know? The boards were cut from trees growing out in the mountains. If you want it perfect, make it out of steel or plastic.

KTW #0711 & #0811
Your Wine Cellar Needs Another Wine Rack!
May 20, 2011

KTW #0611
Here is another floor standing wine rack made from the Khaya (known also as African Mahogany). It’s a 6 X 6, six bottles wide and six racks tall, for three cases worth. The dimensions are 28″ x 15 1/2″ x 42″ tall.
Below: I have glued up contrasting edge band material and crosscut a board, then folded the board back on itself at the cut and glued it up for the field of the top.

There is a woodworking blog that I follow…
http://larrysworkshop.wordpress.com/
Lazy Larry has some very cool ideas about laminating different woods and creating interesting 3D patterns. I decided to start simply and use some of his basic ideas to create my table tops. Above: you see I have ripped some thin strips of White Oak from my dwindling stash that was dried from a fallen tree over on SW Crestwood Lane. I sandwiched a wider strip of Black Walnut, then glued them up with a wide strip of Khaya to form the edge band.

I’m not a very good photographer. I’m of the… take tons of pics… and hope some turn out OK, school of photography. Most of the time. I’m paying attention to what I’m trying to do in the shop, and forget to take shots as I go along in the process of building. Too many times I have stopped to take a photo, been side tracked, only to make mistakes because I forget what I’m doing. I hate that.
Next I milled up the board in the middle here for the legs, rack parts, carcase and drawers…

If I actually took photos of all the individual steps I go through, there would be hundreds of pictures. Unless you are into woodworking, it would be overkill, but I’m just trying to illustrate how many steps there are to making these things… how many steps there are for potential mistakes!

With every new project, I try to refine my ideas and processes, to be faster and still have a shot at quality.

Many woodworkers hate the finishing process. Some do great joinery only to apply bad finishes. I actually like applying finishes and with each piece, I add to my knowledge and experience. Still, it’s like shooting dice and no matter how hard you try there are potential problems. The experts know how to avoid problems and how to fix mistakes and any pitfalls that might occur. Most finishing materials are perishable products and you get one shot at it. Quality finishes are like shooting at a moving target… it’s difficult but not impossible.
Applying a finish is the payoff for me. After I have milled all the parts cleanly and glued everything up square and true, then sanded like crazy… seeing the grain pop out is like opening a present.

Lazy Larry’s lamination idea turned out really cool. I like it. I love the little ripples or “quilting” in the Black Walnut feature strip. There could be so many variations on this concept, I can hardly wait to try some more complex ideas.

More to follow…
Wine Racks-Custom Designs-Made In USA
April 29, 2011

KTW #0411
Six bottles wide by seven racks high, gives you a 42 bottle capacity. Notice how even the fat Champagne style bottles that many wineries are using for their Pinots fit without touching.

This legs and top of this rack was constructed out of Khaya also known as African Mahogany. The racks and contrasting feature strip laminated into the top are Oregon Alder hardwood.

It is 40″ tall, 28 1/2″ wide and 15 1/2″ deep.

I apply three coats of poly-urethane that is virtually water proof and very stain resistant. I use a satin sheen that brings out the natural color and grain of the lumber, imparts a velvety smooth feel, and gives that hand-rubbed antique effect.

I’m surprised that through the whole stack of boards my neighbor Lavrens passed on to me, each piece has very different shades in the color, but yet has the same grain characteristics.

If you are a serious wine enthusiasts, you probably buy bottles a little too expensive or too many bottles that were a deal that couldn’t be passed up. You could treat yourself to a nice hand made rack like this to stash your treasures!

Custom Wine Racks in Portland Oregon
April 26, 2011


KTW #0411-#0511
6 x 7 = 42 and 4 x 6 = 24 bottle capacity racks. #4 on the left is Khaya African Mahogany and #5 is Machiche, a very dense hard tropical lumber from Central America (sometime called Black cabbage-bark). The racks and feature strips in the mitered edge band on the tops is Alder from Oregon.
I got a message right after my last posting and so KTW #0311 has found a good home. Thanks for the support Pete… and for sending me photos!

KTW #0311
I have some interesting wine rack projects going on and I’m starting to think about slicing up a few logs that have been drying for more than a year in the back corner of the shop . More to come, stay tuned…
Knot another wine rack!
February 16, 2011

Yeah, another one. My neighbors who make custom upholstered furniture gave me a bunch of Alder scraps a few months ago. Every month or so, they get a unit of FSC Alder lumber and proceed to make piles of narrow rips and other scraps, perfect for me to mill into rack parts.
I generally try to make parts production style so I can efficiently produce two to four or five racks at a time. This one was cut out along with the rack on my last posting. My deal is to try making all my stuff out of solid wood and not glued up… if I can. It irritates me to look at production furniture and cabinets that boast solid wood, only to see glue joints everywhere.
As I have said before, it would be easy to draw ideas up, go to the lumber yard, buy a bunch of nice material and make cool stuff. The problem is that it costs money. If I could find ways to sell these things and recover that cost, I would be cranking out wild stuff from the many pages I’ve sketched in my design note books.

Sometimes I can find big enough pieces to make solid legs, but in this case, the scraps were wide and long enough, but not thick enough. To solve that, I laminate a different kind of wood so it becomes a part of the design, not just a way to use thinner (cheaper) material, like the typical manufacturing process. In the end, it’s no doubt cheaper, easier, to buy thicker 8/4 material for the legs, but like I said, it cost money. I have way more time than money. I began laminating parts so that they becomes part of the design and look on purpose. In this case, Oregon Black Walnut milled from some logs I dried.

The field for the tops are usually two pieces glued up, either book matched or a single board folded back on itself at the cut, so that the grain matches and many times make the joint invisible. I started using a contrasting feature strip when I laminate the tops for the same reason… make big parts out of small pieces and have the laminations be part of the design.
Knot normally the way I do it…
February 10, 2011

A lady saw photos of a wine rack I posted for sale on craigslist and contacted me. I invited her to the shop to see what different pieces I have in my inventory. She had a corner in her dining room where she wanted to place it and we discussed dimensions.

She looked at completed racks and I explained how the modular nature effected the over all dimensions. She gravitated to a piece that was constructed from Black Walnut and Sapele, and said she really liked the redish color of the Sapele… also know as African Mahogany. She ask what color of stain I used.
I had to laugh and said that there was no stain, I use different hardwoods to show off their natural color. There is no reason to use a stain. I do however use stains on the pieces I make out of soft wood like Pine, Fir or Cedar. I showed her a couple of those different pieces and some raw wood to illustrate how washed out the natural wood looks generally. She wanted, if not to match, at least compliment her dining room table.

She ask how much the Walnut/Sapele piece was and I said it was three times as expensive as the Fir/Pine ones. It was too small for her but she really liked it. I had to laugh again. I said, you have good taste, your like my wife. She sees a red car and says, wow that is a beautiful car, I want one of those. I say, baby you have good taste… that is a Ferarri. How about that red car over there? No, I don’t like that so much. Well Babe, that’s a Toyota.
I had three racks made from Alder that were recently glued up but I had not made tops for yet. They were the right dimension and bottle capacity for her. I showed her the two most common tops I make… Mitered edge band, with or without a contrasting feature strip, and the Breadboard style with through tenon joint.
She liked the Breadboard style, saying that the way I leave the tenon protruding matched her table’s styling. I told her that I never stain hardwoods, but that furniture manufacturers routinely apply stains to Alder. I pulled out my drawer full of sample stain cans and proceeded to wipe stain on some Alder scraps. The first one or two colors were spot on for her. So I made a Breadboard top, stained the piece and applied three coats of polyurethane.

She picked it up yesterday and said it looked great. As much as I would love to be purist, use highly figured exotic woods and tradition oil and wax finishes… I’m not a snob. In the real world, it’s only other woodworkers that really know the difference between a Ferrari and a Toyota… or care. While it’s Knot normally how I do things, it pays the bills. I did like the way it turned out and more importantly so did she. Thanks for the support… another one goes to a good home.

Knot a Wine Rack…
January 16, 2011
It has been about a year since I started this blog. 2010 was one of the worst years I have lived through. Almost nothing went right, I never caught a break and almost every single thing I tried to do, blew up in my face. I feel like a complete failure.
Having said that, I’m not alone. It was hard for almost everybody I talk with. I got a message from WordPress telling me enough people viewed my blog to fill two 747 air planes. Lot of good it did. I got very few comments and even less interest in my wine racks. It’s very disapointing and some what frustrating.
I’m going to try an keep the shop going, but I don’t see how. I don’t have any emotional attachment to it really. Carpentry and wood working is what I have been doing for a living for a long time and I don’t really know what else to do. I going to try and keep going until I can’t anymore. I enjoy the work but it’s not who I am or what I’m about as a person, just a way to try and make money.

This is a piece I built last month for a lady. It is to be used as a night stand. The shelves are for shoes and slippers. She gave me some rough idea of dimensions that would fit in the room and how high it should be for a reading lamp.

I looked through my piles of hardwood lumber and dried logs, but there wasn’t enough to make all the parts I needed in the sizes I wanted. Here is a shot of some Clear Verticle Grain Fir that I re sawed. It came out of a nasty looking old 6 x 12 beam, salvaged from a construction site. While it had some defects and a big knot, it is beautiful material.
It must have been a giant old growth tree by the close growth rings and how many there are. I’m always in awe when I think that every grain was a year… we must be looking at decades… generations to grow this tree.

Here is what’s left of a 2 x 12 somebody gave me fifteen years ago. It has some curly grain to it that is very delicate and most gorgeous. I used it for the legs and the laminated edge-band on the top.

I love the look and color of fir. It is very difficult to work with because it can be splintery and it’s not hard enough to resist dings and dents in furniture. I went with it anyway because it was free. Here are a bunch of parts and you can see that I cut the drawer fronts out of the face frame and glued it back together so that the grain would run through.

Here I am with the tenon cutting machine I built, making round tenons to join the legs with the shelves. I call it the pencil sharpener, because it’s like sharpening big pencils.

When working with fir, you need to have very sharp blades, bits and planer knives or else you get heart breaking tear out or splinters. Sometimes you may run a bunch of pieces through the router table very carefully and think you have it licked… then WHAM, a blow out that rips the piece apart so that the material is wasted.

There are tricks to dealing with this like “Climb Cutting” where you run the work backwards agains the bit so it doesn’t grab the splintery grain…. or making multiple passes, taking a small amount at a time… or both. But, still you never know when the fir will bite you.

I was lucky this time, because I used every trick I know to machine all these parts right the first time. I barely had enough material to design this piece and no spare boards for mistakes and mishaps. In the end, there was barely enough scrap to kindle a fire!

I didn’t make the same mistake that I did on the last piece I built where I flipped the face frame in my haste to glue up the carcase. It’s subtle, but for those who know to look, they are rewarded with the grain running through the frame and drawer fronts.

I mortised my signature drawer pulls that matched the grain too. The last two from a batch of pulls I ran years ago. It takes six router set-ups to make them, so I do it in big batches of all kinds of woods so i don’t have to stop in the middle of a piece and make some.

The thing that took me the longest and was the most difficult, was to design the shelves. The boards I had were just too narrow to use. So I had to come up with a way to make them wider. I drew a dozen solutions but the one I liked the most couldn’t be built. I mean I could draw it, but there was no way to glue and assemble it… looked nice though.

The feature strip in the top is from my dwindling stash of old growth California Redwood. You can’t see in the photos, but there are small “Bird’s Eyes” in the Redwood.

There were two defects in the board I used for the field in the top. I could cut one out, but not both. So, the squiggle you see is a huge splintery check that ran through the whole beam. I glued it and clamped it. When it was planed off it came out smooth. Hey, it was made by hand! This ain’t IKEA.

I sprayed three coats of poly-urethane varnish on it, sanding between the first split-coat and second full wet coat. Then I rubbed out the top coat with double ought steel wool. It gets rid of any sheen and makes it velvety smooth to the touch. It’s virtually water and alcohol proof and pretty stain resistant too. Sometimes candle wax will stain it, but it is the toughest finish I know how to apply.
Over time, it will get used, dented, scratched and dinged. Like I’ve said before, some day after I’m long gone, somebody will pick this piece up, see my signature on the bottom and know that it took took time out of my life to make.
What Next?
Wine Enthusiasts Christmas Gifts…
October 26, 2010
What to get the wine connoisseur or alcoholic wino for Christmas? How about a counter top wine rack?

KTW #1810a
Gen-u-wine Knot Traditional Woodworks wine racks. Produced from local FAS Kiln Dried Alder lumber. (The Forest Stewardship Council is creating sustainable forests worldwide, producing and certifying sustainable lumber for a growing industry of green builders.) The through tenons in the bread board style tops are made from Oregon Black Walnut logs I have dried and milled.

15" x 15" x 14" tall
Further more, I machine parts and hand assemble these wine racks from rips and off cuts, gleaned from the custom upholstered furniture business next door. If I didn’t take it, they would burn it or put in in the dumpster.

I apply three coats of bar top poly-urethane that is stain resistant and virtually water proof. I use a flat sheen so that you can see the natural color of the wood and the grain, not a glossy wet looking finish.

Because my design is modular, I can make four bottle, six bottle and eight bottle racks, that will fit on a counter top or sideboard. I can build them with my miterd tops too… like this four bottle by two shelf model.

KTW #1710
Again, Alder hardwood with Oregon Black Walnut for the feature strip in the top.

23" x 15 1/2" x 14" tall
So many combinations and ways to construct these wine racks. I have some really interesting harwood logs that are drying but not ready to make parts out of yet. I would like to make these from Black Walnut or White Oak eventually too.


If you have some floor space, maybe a unique 36″ tall (counter top height), 20 bottle rack to display your collected wine treasures.

KTW #1610a
The checker board top for this piece was made from some kind of fruit wood, probably apple, for the light squares and Black Walnut.

These legs were milled from a very heavy, hard, dense, tropical wood that a friend of a friend got for me. He works for a lumber importer that was doing inventory and found these big planks buried under dust and debris for years. When they couldn’t identify the planks, didn’t know where they came from, I fortunately ended up with them.

The bread board ends are Sapele, the through tenons are Australian Lacewood and the shelf racks are Alder.

I cut out three of these racks, but only had enough material for two tops, so someday I will come across some nice lumber and make a different top on legs and shelves like these.

KTW #1610b
The top for this piece I made from Alder for the light squares and highly figured Balck Walnut for the dark squares.

23" x 15 1/2" x 36" tall
As much as I try make these in a production fashion, it’s still mostly one offs or two offs like these examples.

I tried to cut boards so that the dark figured grain pattern looks like it runs through lighter squares. My photographs don’t really do it justice.

About the time I get pieces ready to apply a sprayed on finish, I’m already thinking about ways to put the next ones together. There is still time to make some special presents. What is next?
Making Something Out of Nothing. What’s Next?
September 30, 2010
A friend of mine used to say that if there was and easy way, or a hard way, to do something… I will always choose the hard way.

Last fall I decided to try being a vendor at the Portland Saturday Market. Partly just to see if I could actually sell my products, but partly to get feedback about the whole wine rack idea, examples of my design ideas and craftsmanship. I told myself I would give it a year to see how the Market could work for me. If I didn’t try, I wouldn’t really know how it worked.

Above: A piece of fire wood I pulled from a stack. It’s some kind of fruit wood, maybe Apple, but could be from a Plum or Pear tree. Below: I cut some highly figured pieces of Black Walnut, this Apple log and contrasting pieces of Alder. then I cut a tongue and groove with my IPM Machine on a router table with up-cut solid carbide spiral bit.

The red and blue crayon marks are to tell me to route either a tongue or groove.

I tried to organize the pieces so that the grain pattern continues in order through contrasting light/dark pattern.

This experiment in joinery has one more row than the first top I made two months ago. People seeing this first wine rack top said, “Look Honey, we could play chess and drink wine!” I hadn’t even thought of that in terms of it’s graphic representation. I was just trying to make a big top out of small scraps of wood. This time around I added another row to make it look more like a real chess/checker board. I would need two additional rows to actually play a game on it, but this time it looks more like a game board. Because the tops are rectangular, the “squares” wouldn’t turn out square.

It is very time-consuming and tedious to machine parts and glue this up. Adding two more rows so it was a real game board would just add more work.

I still might try it some day but I need to drop back and punt as they say. For me the game is to design things around “FREE” material. It would be too easy to design beautiful, complicated woodworking ideas and just go to the lumber yard and buy expensive, highly figured exotic materials. In the end, I still need to sell them. That is the trick.

One of my neighbors at the shop gave me a two huge planks of some kind of tropical hardwood. He got it from a friend that works at a big wholesale lumber importer. In an inventory they found three big planks covered in dust at the back of the warehouse. Not knowing where the lumber came from or what it was, the friend gave it to my neighbor, who after a while had no use for it. So, it came to me. It is very hard, heavy and dense beautiful material. I used it for legs and rather than cut up big pieces of material, I used off-cuts and rips of Alder wood from my furniture building neighbors to make the racks.

KTW #1610a
It was a beautiful warm summer Saturday and the Market was pretty packed. Just as I hoped, hundreds of people were sucked into my little experiment! I can’t say it enough… If I had a nickel for every person that rubbed the tops, I wouldn’t have to sell them!!! Literally hundreds of people stopped to look at these two pieces and tell me that my craftsmanship was like art work. Great, just what I don’t need to hear anymore.

KTW #1610b
Above: You can see my first “checker board” top in the back. In close to three months, I still haven’t been able to sell it. Despite being told repeatedly that my prices were “very reasonable” or “too cheap”. I chopped fifty bucks off the price of it this day and still didn’t sell it! I tagged the two new pieces at $175 and reduced the prices of everything else at least $25. Very few folks looked at my other pieces or the checker topped piece in back for $125. I handed out a huge stack of business cards, flyers and talked to more people than I can remember about building them custom racks. Not only did I not sell one thing all day, but I never got a single call or e-mail for custom work.

KTW 1610b detail of top
Above: Traditionally styled bread board ends made from Sapele, and the through tenons are Australian Lacewood.
So, I’m coming up on one year of doing the Portland Saturday Market. What have I learned? Expensive lessons:
#1 The only people who are making money at the PSM is the PSM.
#2 Most of the PSM vendors are barely scraping by and many of vendors I talk to are going to quit.
#3 The public comes to the Portland Saturday Market just for cheap entertainment and the social hang out, not to actually buy anything. The economy in Portland is destroyed. If anybody has a job or any money… they ain’t spending it!!
#4 The people who run the Market have a hard task in trying to deal with a City hall and other public agencies that don’t really care to help the Market out. The Vendors who should care about the future of the Market and Market policy, don’t care at all. Having attended the last two membership members meetings with maybe twenty of the same long time vendors in attendance, and the three or four hundred vendors that show up each week conspicuously absent… apathetic would be a good description.
#5 If participation in the market, got my name/brand out there and worked as an advertising tool, it might be worth paying the monthly membership fee, daily booth fees. But to work all week, then get up early Saturday, set up the booth stand there all day, then pack up and go home for a twelve-hour day after not selling one thing to cover the cost of gas and lunch… I must be insane!
#6 I can’t afford to do the Market any more. The half-assed good Market days I had were off set by three bad days. It doesn’t look like this is the right venue for my endeavour. The PSM organizers don’t really care about me or most of the vendors for that matter. They know that there is no shortage of broke, laid off, out of unemployment insurance fools, that will give the direct marketing thing a shot.
The decision whether I should try to continue doing the Market is made for me. It’s not working for me anyway I slice it. I’m sure that there are other things I can try or do… but what ever it is, it needs to be easier.
Onward…
